- Add a Unique Attribute (ID) to the button:
1. In the editor, click on your button to place your cursor on the link.2. Click the link icon in the toolbar to open the link manager popup window.
3. Click on the Advanced tab and in the ID textbox field add a custom ID (the ID cannot have spaces).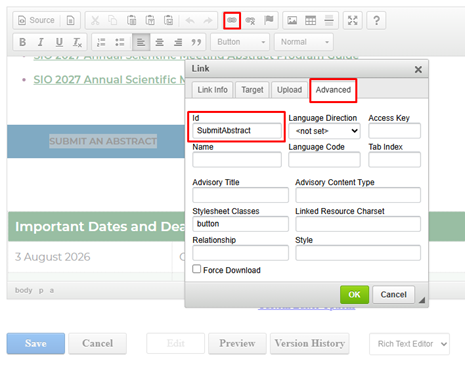
- Enable Built-in Click Variables in GTM:
Inside Google Tag Manager:
- Go to Variables
 Configure (under Built-In Variables).
 - Check all options under Clicks (Click Element, Click Classes, Click ID, Click Target, Click URL, Click Text).
Note: This only needs to be done once per GTM account so it may already have been completed.
3. Create the Click Trigger:
- Go to Triggers
 New.
New. - Choose trigger type: Click - All Elements (or Click - Just Links if it's an <a> tag which in the case of a button it is).
- Set it to fire on Some Clicks.
- Define your condition using the attribute from Step 1 (e.g., Click ID equals SubmitAbstract).
- Name and save the trigger (e.g., Trigger – Abstract Submit Button Click).
4. Create the GA4 Event Tag:
- Go to Tags
 New.
New. - Choose tag type: Google Analytics: GA4 Event.
- Select your Measurement ID (or GA4 Configuration Tag).
- Set Event Name using recommended snake_case naming (e.g., abstract_button_click).
- (Optional) Add Event Parametersif you want to pass extra metadata:
- Parameter Name: button_location | Value: hero_section
- Attach the trigger you created in Step 3 to this tag.
- Save the tag.
5. Preview and Test, then Publish Changes:
- In GTM, click Preview to launch Tag Assistant and visit your live page.
- Click the target button on your site.
- Verify in Tag Assistant that your tag Fired.
- Open GA4
 Admin
Admin  DebugView to confirm the event appears in real time with its parameters.
 - Once verified, click Submit in GTM to publish your changes.
Was this article helpful?
That’s Great!
Thank you for your feedback
Sorry! We couldn't be helpful
Thank you for your feedback
Feedback sent
We appreciate your effort and will try to fix the article